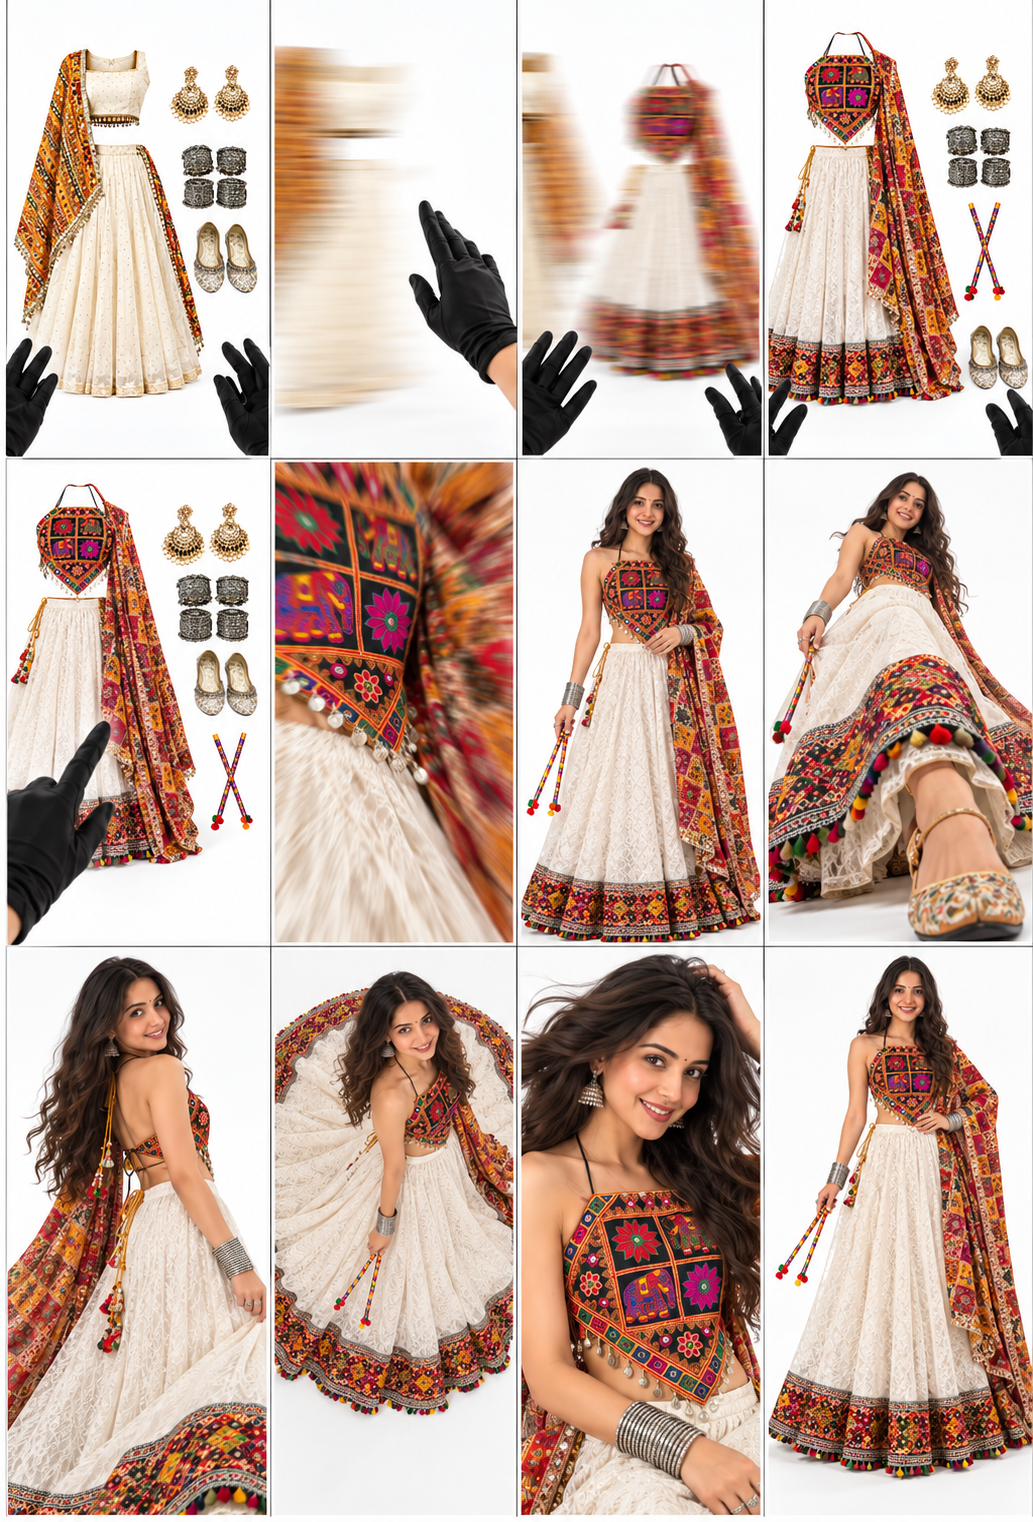
A simple swipe can turn a product display into a striking fashion reveal. In this AI ad concept, gloved hands swipe away one outfit, select another, and bring its fabric toward the camera—transitioning into a model wearing the chosen look.
In this guide, we share the customizable prompts and generated output for a 12-panel storyboard, covering everything from the first product display to runway-inspired shots and the final hero pose. Use your own outfit and model references to adapt the concept for your brand while keeping the clothing details, model identity, and visual style consistent.
1.prompts
storyboard image – Create a premium ultra-photorealistic women’s fashion commercial storyboard as ONE image containing exactly 12 equal portrait panels arranged in FOUR COLUMNS and THREE ROWS. Follow Reference Image 4’s layout, compositions and visual progression. Use thin white dividers, a pure white seamless studio background, soft luxury lighting and realistic shadows. No text, captions, numbers, arrows, logos or watermarks anywhere.
Use Reference Image 1 exclusively for Outfit 01. Use Reference Image 2 exclusively for Outfit 02, the selected outfit. Use Reference Image 3 as the ONLY model identity. If no separate model reference is supplied, use the woman in Reference Image 2. Preserve her recognizable facial features, skin tone, hairstyle and body proportions consistently across every model panel.
Reproduce both outfits faithfully from their respective references: exact colors, fabric, print, embroidery, neckline, sleeves, borders, silhouette, length, layering and draping. Never mix the two outfits. Use only the accessories shown with the corresponding outfit. If footwear is not visible, choose understated matching footwear and keep it consistent. Reference Image 4 controls composition only; do not copy its model, clothing, jewellery or handheld props unless they also appear in the supplied outfit references.
Read the panels from left to right, top to bottom:
Panel 1 — First outfit display: Outfit 01 floats centered in a natural wearable shape, with its matching accessories neatly arranged beside it. Black-gloved first-person hands appear at the bottom corners. No mannequin, head, skin or body parts inside the clothing.
Panel 2 — Swipe left: One gloved hand makes a clear leftward swipe. Outfit 01 and its accessories move toward the LEFT edge with horizontal motion blur.
Panel 3 — Outfit replacement: Outfit 01 partially exits on the LEFT while Outfit 02 enters from the RIGHT. Show two separate, coherent outfit sets in motion without merging their designs.
Panel 4 — Second outfit centered: Outfit 02 stops centered, fully visible, with its matching accessories arranged clearly beside it. Preserve its exact reference design and garment proportions.
Panel 5 — Selection: A black-gloved index finger reaches forward and visibly taps Outfit 02 at its center. The other fingers remain naturally curled. No selection graphics or glowing effects.
Panel 6 — Fabric transition: Extreme close-up of Outfit 02 approaching the lens. Its actual fabric, print or embroidery fills the panel. Slight directional blur around the edges suggests a rapid fabric-wipe transition, while central textile details remain recognizable.
Panel 7 — Model reveal: Full-length frontal portrait of the exact reference woman wearing Outfit 02. She faces the camera with a confident, natural smile. Show the complete outfit and footwear.
Panel 8 — Low-angle runway step: Extreme floor-level perspective as she takes an elegant step toward the camera. One shoe appears in the foreground, with her face visible above. Fabric moves naturally according to the garment’s construction. Preserve the intended coverage and realistic proportions.
Panel 9 — Three-quarter turn: The model turns partly away and looks back over her shoulder toward the camera. Show the outfit’s side and back silhouette, with natural hair and fabric movement. Keep the reference garment’s construction consistent.
Panel 10 — Overhead fashion pose: A dramatic overhead view captures her looking up during a graceful pivot. If the outfit has a flowing skirt or drape, let it spread naturally. For fitted outfits or trousers, use a poised step-turn without inventing extra fabric.
Panel 11 — Close beauty portrait: Tight upper-body editorial portrait of the same woman, one hand naturally near her hair, with a warm confident expression. Keep her face and the outfit’s upper details clearly visible. Preserve any referenced jewellery.
Panel 12 — Final hero pose: Full-length frontal fashion portrait. She stands confidently with one hand at her waist and the other relaxed, or holding only an accessory supplied in the outfit reference. Keep her complete head, garment hem and both shoes within the frame.
Maintain identical model identity and Outfit 02 throughout panels 7–12. Natural skin texture, anatomically correct hands, realistic fabric weight, accurate embroidery placement and coherent lighting. Each panel must be a distinct photographic shot. No extra people, duplicate limbs, unrelated props, outfit redesigns, face changes, cartoon rendering or decorative text.
Output
2.Prompts
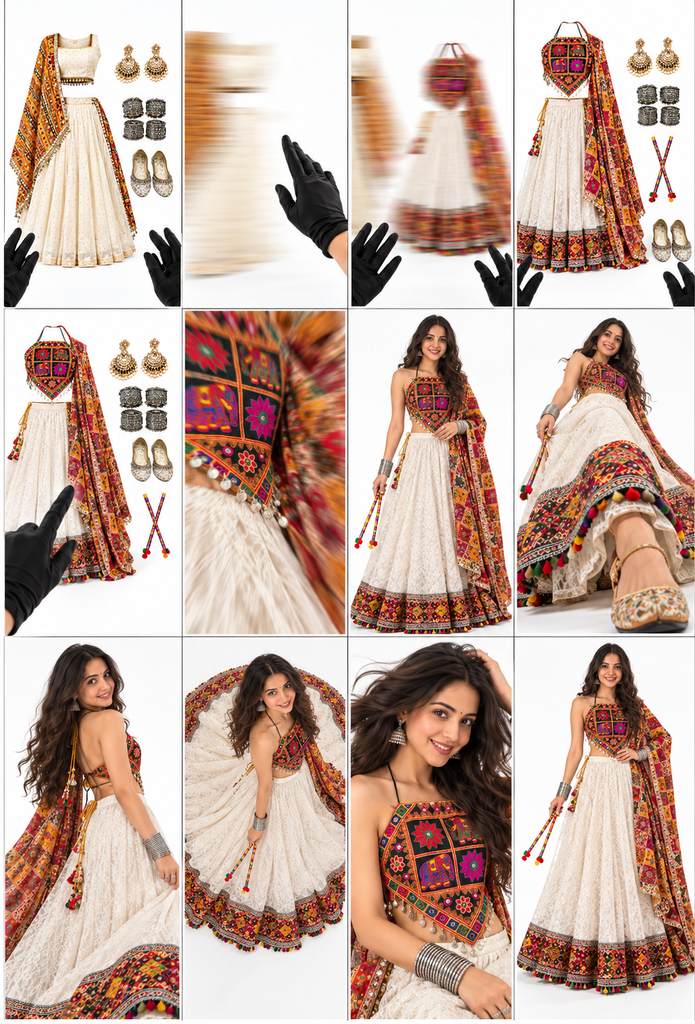
video prompt – Create a 10-second ultra-photorealistic 9:16 luxury Indian fashion commercial following the provided 12-frame storyboard in exact left-to-right, top-to-bottom order. Pure white seamless studio with soft premium lighting. Use the woman in the uploaded model reference as the ONLY identity, preserving her facial features, skin tone, long dark wavy hair, small bindi and natural smile throughout.
0.0–0.8 seconds — Frame 1: First-person POV with female hands wearing black gloves. Outfit 01 floats centered in mid-air: ivory sleeveless square-neck choli with dangling hem ornaments, flowing ivory lehenga with subtle gold detailing, mustard-orange patterned dupatta, matching earrings, bangles and embroidered juttis. Match the first outfit reference precisely.
0.8–1.6 seconds — Frames 2–3: One gloved hand swipes LEFT. Outfit 01 and its accessories slide rapidly offscreen LEFT while Outfit 02 enters from the RIGHT. Use realistic directional motion blur and smooth coordinated movement.
1.6–2.2 seconds — Frames 4–5: Outfit 02 stops centered, floating with its accessories neatly arranged: black multicolored embroidered handkerchief halter choli featuring floral and elephant motifs with silver dangling trim, white lace lehenga with a broad colorful embroidered border and tiny tassels, richly patterned patchwork dupatta, silver jhumkas, silver bangles, embroidered juttis and colorful dandiya sticks. A black-gloved index finger reaches forward and taps the outfit.
2.2–2.8 seconds — Frame 6: The selected outfit rushes directly into the lens. Embroidered choli details, patchwork fabric and white lace fill the screen, creating a seamless fabric-wipe transition without flashes or magical particles.
2.8–3.7 seconds — Frame 7: Camera pulls back to reveal the exact reference woman wearing Outfit 02, full-length and front-facing. Her dupatta rests over her left shoulder, and she holds the colorful dandiya sticks together in her right hand. She smiles confidently and begins walking toward the camera.
3.7–4.6 seconds — Frame 8: Extreme floor-level tracking captures an embroidered jutti stepping toward the lens beneath the naturally swaying lehenga. Camera tilts upward along the flowing skirt toward her face. Her steps are elegant and controlled, with realistic fabric weight and movement.
4.6–5.5 seconds — Frame 9: A fast, smooth 90-degree camera orbit reveals a three-quarter rear view as she makes a graceful shoulder turn and looks back toward the lens. Her long dark hair and dupatta trail naturally behind the movement.
5.5–6.4 seconds — Frame 10: Camera rises into a dramatic overhead view. She makes a controlled pivot, gently spreading the lehenga into a flowing circular shape, and looks up toward the camera. Keep the dandiya sticks securely in her right hand.
6.4–7.6 seconds — Frame 11: Camera descends into a dynamic close portrait. She completes a playful half-turn with a natural hair sweep, a bright confident expression and a subtle left-hand movement near her hair. Keep her face clearly recognizable and the embroidered choli details sharp.
7.6–10.0 seconds — Frame 12: Camera rapidly pulls back to a full-body frontal hero composition. She settles into a striking pose with her left hand on her waist and the dandiya sticks held beside her right leg. Her entire lehenga, embroidered border and footwear remain inside the frame. Camera comes to a precise HARD BRAKE, followed by an elegant, stable final hold as her hair, dupatta and skirt gently settle.
Preserve the exact model identity, both distinct outfits, embroidery, colors and accessories from the references. Maintain anatomically natural hands, consistent jewelry, realistic textile physics, cinematic motion blur and seamless shot continuity. Keep every movement readable within the 10-second duration and follow the storyboard order without adding shots. No extra people, text, numbers, captions, logos, watermarks or magical effects.
Output
3.Prompts
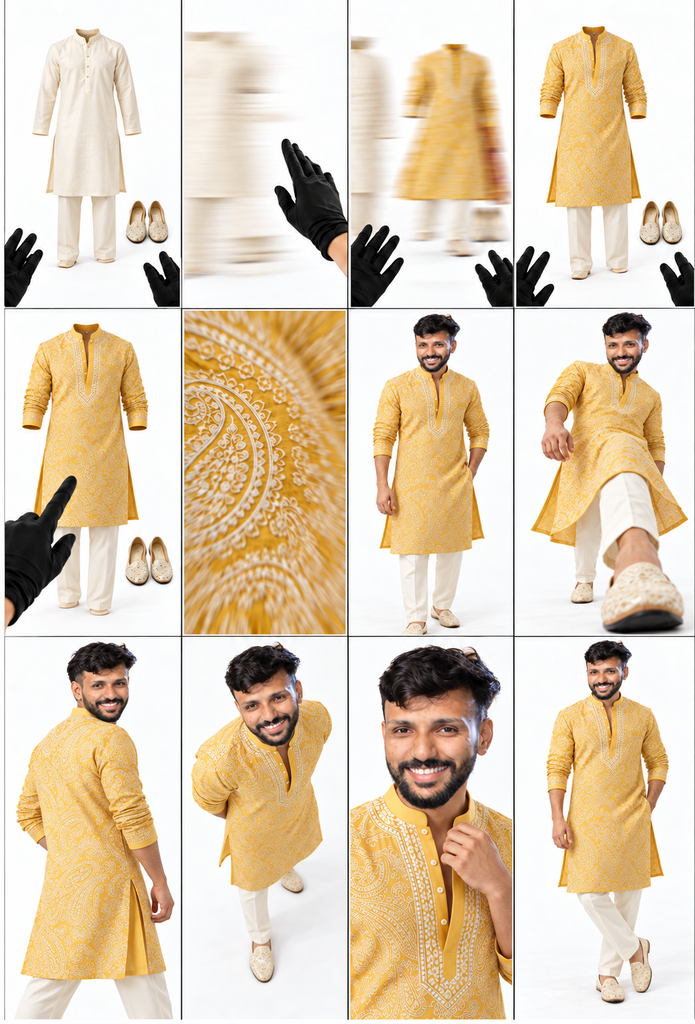
male storyboard image prompt – Create an ultra-photorealistic luxury menswear commercial storyboard containing exactly 12 panels arranged in four columns and three rows. Use Reference Image 4 only for the panel layout, shot compositions and action sequence. Pure white seamless studio, soft premium lighting, realistic shadows and narrow clean gutters. No text, numbers, captions, arrows, logos or watermarks anywhere.
REFERENCE RULES: Use the exact outfit from Reference Image 1 as Outfit 01. Use the exact outfit from Reference Image 2 as Outfit 02. Use the male model from Reference Image 3 as the only character identity in every model shot. Preserve his facial features, hairstyle, facial hair, skin tone and body proportions. Do not borrow the identity or clothing of any person in the storyboard reference. Match each product’s actual colors, fabric, embroidery, print placement, neckline, sleeves, buttons, length and silhouette. Do not combine details from the two outfits. Keep any necessary complementary trousers and footwear consistent.
Follow this sequence from left to right, top to bottom:
Panel 1: Outfit 01 floats centered in a natural wearable shape, with its matching pieces and footwear neatly arranged. Two black-gloved first-person hands appear at the lower corners. No visible mannequin, body, head or skin inside the garments.
Panel 2: One gloved hand performs a clear leftward swipe. Outfit 01 moves rapidly toward the left edge with directional motion blur.
Panel 3: Outfit 01 exits on the left while Outfit 02 enters from the right. Keep both products visually distinct during the transition.
Panel 4: Outfit 02 stops perfectly centered, floating with its coordinated pieces and footwear clearly visible.
Panel 5: A black-gloved index finger reaches forward and taps Outfit 02 to select it.
Panel 6: Extreme close-up of Outfit 02 rushing toward the lens. Its actual fabric texture and product details fill the panel, suggesting a seamless fabric-wipe transition.
Panel 7: Full-length frontal reveal of the exact male model from Reference Image 3 wearing Outfit 02. Confident posture, relaxed expression and natural garment fit.
Panel 8: Extreme floor-level runway perspective. The model steps toward the camera, with one shoe in the foreground, realistic garment movement and his face visible above.
Panel 9: Three-quarter rear view as he makes a controlled turn and looks back toward the camera. Preserve the garment’s construction and consistent fit.
Panel 10: Dramatic overhead fashion portrait. The model looks upward toward the lens during a relaxed pivot, with one foot slightly forward.
Panel 11: Close editorial portrait showing the model’s recognizable face and the product’s upper details. One hand naturally adjusts the collar or upper garment edge, appropriate to the referenced outfit.
Panel 12: Full-length frontal hero pose. The model stands confidently with one hand naturally near his pocket and the other relaxed. Keep his entire head, outfit and both shoes within the panel.
Maintain the same model identity and exact Outfit 02 throughout panels 7–12. Professional fashion photography, realistic skin texture, natural anatomy, accurate fabric weight and consistent studio lighting. No extra people, duplicate limbs, unrelated accessories, outfit redesigns or cartoon styling.
Output
4.Prompts
video prompt – Create a 10-second ultra-photorealistic 9:16 luxury menswear commercial using the uploaded 12-frame storyboard as the exact visual reference. Follow the frames from left to right, top to bottom. Show each scene full-screen, never the storyboard grid. Pure white seamless studio, soft premium lighting, realistic shadows and crisp embroidery details. Preserve the exact male model’s face, hairstyle, beard, skin tone, body proportions and smile from the uploaded reference throughout.
0.0–0.8 seconds — Frame 1: First-person POV with black-gloved hands at the lower corners. The plain ivory kurta, ivory trousers and embroidered traditional shoes float centered in a neatly arranged product display. Garments have natural wearable volume, with no visible body or mannequin inside.
0.8–1.6 seconds — Frames 2–3: One gloved hand makes a clear LEFT swipe. The ivory outfit slides rapidly offscreen LEFT while the mustard embroidered outfit enters from the RIGHT. All matching pieces move together with realistic directional motion blur.
1.6–2.2 seconds — Frames 4–5: The mustard kurta, ivory trousers and embroidered shoes stop centered. Match the storyboard’s exact paisley embroidery, collar, placket, sleeve details and colors. A black-gloved index finger reaches forward and taps the kurta once to select it.
2.2–2.8 seconds — Frame 6: The selected outfit rushes directly toward the camera. Mustard fabric and ivory embroidery expand until they completely cover the lens, creating a seamless fabric-wipe transition. The gloved hands leave the frame.
2.8–3.7 seconds — Frame 7: Camera pulls back to reveal the exact reference model wearing the selected outfit. Full-length frontal composition, warm confident smile, natural posture. He begins walking toward the camera with relaxed runway energy.
3.7–4.6 seconds — Frame 8: Camera drops to an extreme floor-level tracking angle and moves backward as he steps forward. One embroidered shoe approaches the foreground without touching the lens. His trousers crease naturally, and the kurta hem sways with his stride. Tilt upward to include his smiling face.
4.6–5.5 seconds — Frame 9: A smooth, fast 90-degree camera orbit follows his controlled body turn into a three-quarter rear view. He looks back over his shoulder toward the lens, smiling naturally. Preserve the kurta’s embroidery and length as the fabric follows his movement.
5.5–6.4 seconds — Frame 10: Camera rises into a dramatic overhead angle. He makes a small relaxed pivot, briefly holding his hands behind his back and looking up toward the lens, matching the storyboard. Keep his proportions natural.
6.4–7.6 seconds — Frame 11: Camera descends and pushes into a close editorial portrait. He brings one hand forward to gently adjust the kurta collar, maintaining direct eye contact and his recognizable smile. Show sharp facial detail and the embroidered neckline. The gesture remains subtle and anatomically natural.
7.6–10.0 seconds — Frame 12: Camera rapidly pulls back into a full-body hero composition. He settles into the storyboard’s final pose: one hand in his pocket, the other relaxed beside him, one leg casually crossed in front of the other. Keep his entire head, kurta and both shoes inside the frame. Camera reaches a precise HARD BRAKE by 8.8 seconds and holds steady until the end while the fabric gently settles.
Use smooth camera choreography, controlled speed ramps, realistic fabric physics and cinematic motion blur during fast transitions. Keep his face sharp and consistent in reveal shots. Preserve the exact mustard outfit, embroidery placement, ivory trousers and footwear throughout all model shots. No extra people, duplicate limbs, distorted fingers, face changes, garment morphing, sliding embroidery, text, captions, logos, watermarks, panel borders or magical effects.
Output
5.Ptompts
jewellery storyboard image prompt – Reference images is order mein upload karo:
- Image 1: Pehla jewellery set, jise swipe karke hatana hai.
- Image 2: Main jewellery set, jise select karke model ko pehnana hai.
- Image 3: Model reference. Agar nahi doge, toh storyboard wali model use hogi.
- Image 4: Storyboard reference—layout, poses aur camera angles ke liye.
Customisable storyboard image prompt:
Create ONE ultra-photorealistic luxury women’s jewellery advertising storyboard containing exactly TWELVE equal portrait panels arranged in FOUR COLUMNS and THREE ROWS. Follow Reference Image 4’s panel layout, camera angles and visual sequence. Use thin ivory dividers, a warm champagne-beige studio background, soft premium lighting and realistic metal reflections. Absolutely no text, numbers, captions, arrows, logos or watermarks.
REFERENCE MAPPING:
Reference Image 1 defines Jewellery Set 01, the initial set that will be swiped away.
Reference Image 2 defines Jewellery Set 02, the selected hero product that appears on the model.
Reference Image 3 defines the model’s identity. Preserve her exact facial features, skin tone, hairstyle and body proportions throughout all model panels. If no separate model reference is supplied, use the same woman shown in Reference Image 4.
Reference Image 4 defines composition and storytelling only. Do not copy its jewellery when it differs from the product references.
PRODUCT ACCURACY:
Reproduce each jewellery set exactly from its own reference. Preserve metal color, surface finish, chain structure, motif count, motif spacing, pendant shape, stone colors, settings, bead details, earring construction and relative proportions. Do not combine elements from the two sets. Remove product-photo backgrounds, stands, tags and packaging from the floating displays.
Jewellery Set 02 must remain identical across its floating display, macro details and model shots. Preserve realistic wearable scale. Stud earrings must remain studs; hanging earrings must retain their original drops. Do not add gemstones, pearls, pendants or matching pieces that are absent from the product reference. Style the model in understated clothing with a neckline that leaves the necklace fully visible and hair arranged to reveal the earrings. No unrelated jewellery.
PANEL SEQUENCE — LEFT TO RIGHT, TOP TO BOTTOM:
Panel 1 — Initial jewellery display: Jewellery Set 01 floats centered in a clean, elegant product arrangement. The necklace follows a natural curved shape, with its matching earrings clearly separated beside or above it. Black-gloved first-person hands appear at the lower corners.
Panel 2 — Swipe left: One black-gloved hand makes a clear leftward swiping gesture. Jewellery Set 01 moves toward the LEFT edge with horizontal motion blur. Preserve the set’s structure during movement.
Panel 3 — Product replacement: Jewellery Set 01 partially exits on the LEFT while Jewellery Set 02 enters from the RIGHT. Show two distinct sets moving horizontally like a product carousel. Do not merge, overlap confusingly or transform one design into the other.
Panel 4 — Selected product centered: Jewellery Set 02 is now fully centered and sharply visible. Show the complete necklace and matching earrings in a balanced floating arrangement. Keep every important product detail unobstructed.
Panel 5 — Tap to select: A black-gloved index finger reaches forward and gently touches a prominent necklace detail to select the entire set. The remaining fingers are naturally curled. Keep the contact point visible. No lifting, grabbing, buttons or glowing selection graphics.
Panel 6 — Product macro transition: Extreme macro view of Jewellery Set 02 approaching the lens. Feature its actual craftsmanship—metalwork, stones, links or pendant detail, as appropriate to the reference. Keep the central detail sharp, with slight directional blur at the edges suggesting a rapid zoom transition.
Panel 7 — Model reveal: Chest-up frontal portrait of the reference model wearing the exact Jewellery Set 02. The necklace sits naturally against her neck and upper chest. Both earrings are visible. She looks toward the camera with a soft, confident smile.
Panel 8 — Necklace close-up: Tight crop from the lower face to the upper chest, emphasizing the necklace’s complete front design and natural fit. One hand rests gently near her shoulder without covering the product. Preserve the necklace’s dimensions and motif arrangement.
Panel 9 — Earring detail: Three-quarter face and ear close-up. The model gently tucks her hair behind her ear, exposing the exact matching earring. Keep the earring sharply focused, anatomically attached and correctly scaled.
Panel 10 — Elevated beauty angle: Slightly elevated three-quarter portrait. The model looks softly upward, allowing the necklace and one earring to catch subtle highlights. Keep the full front of the necklace visible.
Panel 11 — Intimate portrait: Close beauty portrait with a gentle head turn and a relaxed expression. Show one earring clearly and retain visible necklace detail. Her hands, if included, must not hide the jewellery.
Panel 12 — Final hero portrait: Centered chest-up frontal composition. The model faces the camera with a warm, confident smile. Show the complete necklace and both earrings clearly, with her hands outside the product area. Finish with a polished luxury campaign look.
Maintain the same model, styling, product design and lighting throughout panels 7–12. Use natural skin texture, anatomically correct hands, realistic gold or metal reflections and physically believable jewellery placement. All twelve panels must be distinct photographic compositions. No extra people, duplicate earrings, changing pendants, oversized jewellery, distorted fingers, artificial sparkle graphics, magical effects or cartoon rendering.
6.Prompts
video prompt – Create a 10-second ultra-photorealistic 9:16 luxury jewellery commercial using the uploaded 12-panel storyboard as the exact visual guide. Follow the panels from left to right, top to bottom. Every shot must fill the screen; never display the storyboard grid. Warm champagne-beige seamless background, soft premium lighting, realistic gold reflections and shallow depth of field.
0.0–0.8 seconds — Frame 1: First-person POV with black-gloved hands visible at the lower corners. The first jewellery set—a delicate gold chain with a single pearl pendant and matching pearl studs—floats centered in an elegant product arrangement. Camera gently moves forward.
0.8–1.6 seconds — Frames 2–3: One gloved hand performs a clear LEFT swipe. The entire pearl jewellery set slides offscreen LEFT. Simultaneously, the reference gold coin necklace and matching maroon stone studs enter from the RIGHT. Keep both sets separate, moving like two items in a horizontal product carousel. Use controlled directional motion blur.
1.6–2.2 seconds — Frames 4–5: The second jewellery set stops centered, fully visible. A black-gloved index finger reaches forward and taps a maroon medallion once, clearly selecting this set. The necklace responds with a tiny backward movement and settles. No buttons, interface graphics or glowing selection effects.
2.2–2.9 seconds — Frame 6: The selected necklace advances rapidly toward the lens. Camera pushes into the maroon stones and embossed gold coin details until they fill the screen. Use this macro movement as a seamless match-cut transition into the same jewellery already worn by the model. Do not show the necklace morphing into skin or passing through her body.
2.9–3.8 seconds — Frame 7: Camera pulls back into a chest-up frontal reveal of the exact woman from the storyboard wearing the selected necklace and matching round stud earrings. Preserve her face, hairstyle, makeup and maroon outfit. She gently lifts her chin and gives a subtle, confident smile. Keep the complete necklace unobstructed.
3.8–4.7 seconds — Frame 8: Smooth push-in toward her neckline. Camera glides slightly sideways across the gold coins and maroon stone details. Her fingertips rest lightly near her shoulder without covering the jewellery. The necklace remains naturally supported against her skin, with only subtle movement from breathing.
4.7–5.6 seconds — Frame 9: Camera arcs toward her ear as she slowly turns her head and gently tucks a loose strand of hair behind it. Focus shifts onto the matching round maroon stud. Keep its shape and size unchanged; it stays securely attached to the earlobe without dangling.
5.6–6.5 seconds — Frame 10: Camera rises into a slightly elevated three-quarter portrait. She looks softly upward and turns her shoulder a little, allowing the necklace and earring to catch controlled highlights. Movement stays graceful and restrained.
6.5–7.7 seconds — Frame 11: A smooth close camera arc returns toward her face. She turns gently toward the lens with a warm smile. Use a delicate focus shift from the earring to her eyes while retaining recognizable jewellery detail.
7.7–10.0 seconds — Frame 12: Camera eases backward into the final centered chest-up hero portrait. She faces forward, both earrings and the entire necklace clearly visible, hands lowered outside the composition. Camera settles into a stable hold by 8.8 seconds. Finish with direct eye contact, a soft smile and natural breathing.
The original jewellery product reference is the authority for the necklace’s design, coin arrangement, medallion count, stone placement, gold color and matching earrings. Preserve those details across product shots and model shots without simplifying or redesigning them. Maintain the same model identity throughout. Use realistic metal weight, articulated necklace movement, natural skin texture and anatomically correct hands. Keep transitions energetic and beauty shots elegant. No extra jewellery, extra people, floating jewellery after the model reveal, face morphing, changing stones, duplicate fingers, artificial sparkle effects, text, logos, watermarks or panel borders.
